참고
Azure AI 검색 Azure 포털, REST API 및 Azure SDK 통해 사용할 수 있습니다. 또한 엔터프라이즈 콘텐츠를 Microsoft Foundry 포털의 에이전트에 대해 재사용 가능한 사용 권한 인식 기술 자료로 변환하는 관리되는 기술 계층인 Foundry IQ를 뒷받침합니다.
중요
기능, 기능 또는 표시된 속성(미리 보기)은 서비스 수준 계약에 포함되지 않으며 프로덕션 워크로드에는 권장되지 않으며 일반적으로 사용 가능해지기 전에 변경되거나 제한될 수 있습니다. Azure AI 검색 미리 보기 용어는 독립 실행형 기능이든 일반 공급 기능의 일부이든 관계없이 모든 미리 보기 기능에 적용됩니다.
Azure AI 검색와 Foundry 에이전트 서비스를 통합하여 agentic 검색을 지원하는 지능형 MCP 솔루션을 만드는 방법을 알아봅니다. 고객 지원 또는 기술 문제 해결과 같은 대규모 지식 도메인에 대해 복잡한 추론이 필요한 대화형 애플리케이션에 이 아키텍처를 사용할 수 있습니다.
이 자습서에서는 두 위치에서 미리 보기 REST API 표면을 사용합니다. 지식 베이스는 추출형 출력과 최소한의 추론을 명시적으로 지정하기 위해 output_mode 및 retrieval_reasoning_effort(미리 보기)를 사용하지만, 일반적으로는 동등한 동작을 사용할 수 있습니다. 프로젝트 연결은 RemoteTool(미리 보기)와 프로젝트 관리 ID를 사용하여 Azure AI 검색에 인증합니다.
이 자습서에서는 다음을 수행합니다.
- Azure AI 검색 및 Microsoft Foundry에 대한 역할 기반 액세스 구성
- Azure AI 검색에서 검색 인덱스, 지식 소스, 그리고 지식 베이스 만들기
- Azure AI 검색 및 Microsoft Foundry 간의 MCP 통신을 위한 프로젝트 연결 만들기
- 검색에 MCP 도구를 사용하는 Microsoft Foundry에서 에이전트 만들기
- 에이전트와 채팅하여 솔루션 테스트
- 솔루션 최적화를 위한 팁 검토
팁
바로 시작하시겠습니까? GitHub에서 agentic-retrieval-pipeline-example Python 노트북을 클론합니다. Notebook에는 이 자습서의 코드가 즉시 실행 가능한 형식으로 포함되어 있습니다.
인바운드 및 아웃바운드 프라이빗 연결 유효성 검사에 중점을 둔 프라이빗 배포 경로는 자습서: Foundry IQ에 대한 프라이빗 에이전트 검색 배포를 참조하세요.
필수 구성 요소
에이전트 검색을 제공하는 모든 지역의 Azure AI 검색 서비스입니다.
Microsoft Foundry 프로젝트 및 리소스입니다. 프로젝트를 만들면 리소스가 자동으로 만들어집니다.
쿼리 시간 벡터화를 위해 프로젝트에 배포된 텍스트 포함 모델입니다. 이 솔루션은
text-embedding-3-large를 사용합니다.에이전트를 위한 프로젝트에 배포된 LLM입니다. 이 솔루션은
gpt-5-mini를 사용합니다.GPT-4 제품군 모델은 더 이상 사용되지 않습니다. Microsoft Foundry의 사용 중지 날짜 및 현재 상태는 모델 사용 중지 일정 - Microsoft Foundry를 참조하세요.
Azure AI 검색 및 Microsoft Foundry 리소스에 액세스하고 관리할 수 있는 권한입니다. 자세한 내용은 액세스 구성을 참조하세요.
Python 3.8 이상.
Visual Studio CodePython 및 Jupyter 확장입니다.
Azure CLI를 사용하여 Microsoft Entra ID의 키 없는 인증.
중요
검색 서비스에 대한 공용 네트워크 액세스를 사용하지 않도록 설정하고 네트워크 격리 Microsoft Foundry 리소스에서 에이전트 도구로 사용하는 경우 Microsoft Foundry(새) 포털, SDK 또는 CLI를 사용하여 에이전트를 빌드해야 합니다. Microsoft Foundry(클래식) 포털은 이 시나리오를 지원하지 않습니다. 자세한 내용은 네트워크 격리를 사용하는 에이전트 도구를 참조하세요.
솔루션 이해
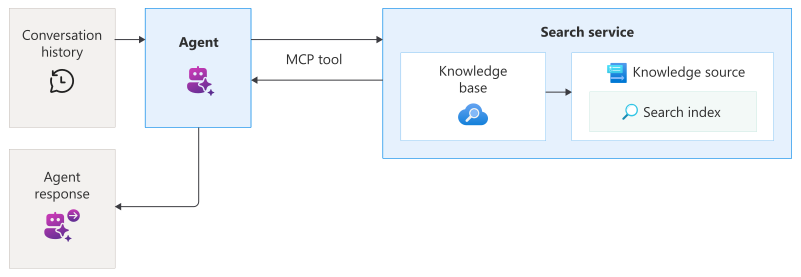
이 솔루션은 Azure AI 검색 및 Microsoft Foundry를 결합하여 엔드 투 엔드 검색 파이프라인을 만듭니다.
Azure AI 검색 쿼리 계획, 쿼리 실행 및 결과 합성을 처리하는 기술 자료를 호스팅합니다. 지식 소스를 참조하는 지식 기반과 콘텐츠 저장을 위한 검색 인덱스, 그리고 지식 소스에서 하이브리드 검색을 수행하는 지식 기반을 생성합니다.
Microsoft Foundry Azure OpenAI 모델 배포, 프로젝트 연결 및 에이전트를 호스트합니다. 기술 자료의 MCP 엔드포인트를 가리키는 프로젝트 연결을 만든 다음 MCP 도구를 사용하여 기술 자료에 액세스하는 에이전트를 만듭니다.
사용자는 에이전트를 호출하는 챗봇과 같은 클라이언트 앱과 상호 작용하여 쿼리 처리를 시작합니다. 에이전트는 MCP 도구를 사용하여 기술 자료에 대한 요청을 오케스트레이션하고 응답을 합성합니다. 챗봇이 에이전트를 호출하면 MCP 도구는 Azure AI 검색 기술 자료를 호출하고 에이전트 및 챗봇에 응답을 보냅니다.
액세스 구성
시작하기 전에 콘텐츠 및 작업에 액세스할 수 있는 권한이 있는지 확인합니다. 인증 및 권한 부여를 위한 역할 기반 액세스를 위해 Microsoft Entra ID 것이 좋습니다. 역할을 할당하려면 소유자 또는 사용자 액세스 관리자 여야 합니다. 역할이 가능하지 않은 경우 대신 키 기반 인증 을 사용합니다.
이 솔루션에 대한 액세스를 구성하려면 다음을 수행합니다.
Azure 포털 로그인합니다.
검색 서비스와 프로젝트 모두에 시스템 할당 관리 ID를 사용하도록 설정합니다. 각 리소스의 ID 페이지에서 수행할 수 있습니다.
검색 서비스에서 역할 기반 액세스를 사용하도록 설정하고다음 역할을 할당합니다.
역할 담당자 목적 Search Service 기여자 사용자 계정 개체 만들기 인덱스 데이터 기여자 검색 사용자 계정 데이터 로드 인덱스 데이터 판독기 검색 사용자 계정 및 프로젝트 관리 ID 인덱싱된 콘텐츠 읽기 프로젝트의 부모 리소스에서 다음 역할을 할당합니다.
역할 담당자 목적 Foundry 사용자 사용자 계정 모델 배포에 액세스하고 에이전트 만들기 Foundry 프로젝트 관리자 사용자 계정 프로젝트 연결 만들기 및 에이전트에서 MCP 도구 사용 Cognitive Services 사용자 검색 서비스 관리 ID 기술 자료에 액세스
중요
Foundry RBAC 역할의 이름이 최근에 바뀌었습니다. Foundry User, Foundry OwnerFoundry 계정 소유자 및 Foundry Project Manager는 이전에 Azure AI 사용자, Azure AI 소유자, Azure AI 계정 소유자 및 Azure AI Project Manager로 이름이 지정되었습니다. 이름 바꾸기가 롤아웃되는 동안 일부 위치에서는 이전 이름이 계속 표시될 수 있습니다. 역할 ID 및 핵심 권한은 이름 바꾸기에 의해 변경되지 않습니다.
환경 설정
로컬 시스템에 명명된
tutorial-agentic-retrieval폴더를 만듭니다.Visual Studio Code 폴더를 엽니다.
View>커먼드 팔레트를 선택한 다음, Python: 환경 만들기 선택합니다. 프롬프트에 따라 가상 환경을 만듭니다.
터미널>새 터미널을 선택합니다.
필요한 패키지를 설치합니다.
pip install azure-ai-projects==2.0.0b1 azure-mgmt-cognitiveservices azure-identity ipykernel python-dotenv azure-search-documents==11.7.0b2 requests openai폴더에
.env이름이 지정된tutorial-agentic-retrieval파일을 만듭니다.다음 변수를
.env파일에 추가하여 자리 표시자 값을 사용자 고유의 값으로 바꿉니다.AZURE_SEARCH_ENDPOINT = https://{your-service-name}.search.windows.net PROJECT_ENDPOINT = https://{your-resource-name}.services.ai.azure.com/api/projects/{your-project-name} PROJECT_RESOURCE_ID = /subscriptions/{subscription-id}/resourceGroups/{resource-group-name}/providers/Microsoft.CognitiveServices/accounts/{account-name}/projects/{project-name} AZURE_OPENAI_ENDPOINT = https://{your-resource-name}.openai.azure.com AZURE_OPENAI_EMBEDDING_DEPLOYMENT = text-embedding-3-large AGENT_MODEL = gpt-5-miniAzure 포털에서 엔드포인트 및 리소스 ID를 찾을 수 있습니다.
AZURE_SEARCH_ENDPOINT은 검색 서비스의 개요 페이지에 있습니다.PROJECT_ENDPOINT는 프로젝트의 엔드포인트 페이지에 있습니다.PROJECT_RESOURCE_ID는 프로젝트의 속성 페이지에 있습니다.AZURE_OPENAI_ENDPOINT는 프로젝트의 부모 리소스의 엔드포인트 페이지에 있습니다.
Microsoft Entra ID 키 없는 인증의 경우 Azure 계정에 로그인합니다. 구독이 여러 개 있는 경우 Azure AI 검색 및 Microsoft Foundry 리소스를 포함하는 구독을 선택하십시오.
az login폴더에
tutorial.ipynb이름이 지정된tutorial-agentic-retrieval파일을 만듭니다. 다음 섹션에서 이 파일에 코드 셀을 추가합니다.
솔루션 빌드
이 섹션에서는 에이전트 검색 솔루션의 구성 요소를 만듭니다.
tutorial.ipynb 노트북의 각 코드 스니펫을 별도 코드 셀에 추가하고 셀을 순차적으로 실행합니다.
이 섹션의 단계는 다음과 같습니다.
- 연결 불러오기
- 검색 인덱스 만들기
- 인덱스로 문서 업로드
- 기술 자료 만들기
- 기술 자료 만들기
- 프로젝트 클라이언트 설정
- 프로젝트 연결 만들기
- MCP 도구를 사용하여 에이전트 만들기
- 에이전트와 채팅
- 리소스 정리
연결 로드
다음 코드는 .env 파일에서 환경 변수를 로드하고 Azure AI 검색 및 Microsoft Foundry에 대한 연결을 설정합니다.
import os

from azure.identity import DefaultAzureCredential
from azure.mgmt.core.tools import parse_resource_id
from dotenv import load_dotenv

load_dotenv(override=True) # Take environment variables from .env

project_endpoint = os.environ["PROJECT_ENDPOINT"]
project_resource_id = os.environ["PROJECT_RESOURCE_ID"]
project_connection_name = os.getenv("PROJECT_CONNECTION_NAME", "earthknowledgeconnection")
agent_model = os.getenv("AGENT_MODEL", "gpt-5-mini")
agent_name = os.getenv("AGENT_NAME", "earth-knowledge-agent")
endpoint = os.environ["AZURE_SEARCH_ENDPOINT"]
credential = DefaultAzureCredential()
knowledge_source_name = os.getenv("AZURE_SEARCH_KNOWLEDGE_SOURCE_NAME", "earth-knowledge-source")
index_name = os.getenv("AZURE_SEARCH_INDEX", "earth-at-night")
azure_openai_endpoint = os.environ["AZURE_OPENAI_ENDPOINT"]
azure_openai_embedding_deployment = os.getenv("AZURE_OPENAI_EMBEDDING_DEPLOYMENT", "text-embedding-3-large")
azure_openai_embedding_model = os.getenv("AZURE_OPENAI_EMBEDDING_MODEL", "text-embedding-3-large")
base_name = os.getenv("AZURE_SEARCH_AGENT_NAME", "earth-knowledge-base")

# Parse the resource ID to extract subscription and other components
parsed_resource_id = parse_resource_id(project_resource_id)
subscription_id = parsed_resource_id['subscription']
resource_group = parsed_resource_id['resource_group']
account_name = parsed_resource_id['name']
project_name = parsed_resource_id['child_name_1']
검색 인덱스 만들기
Azure AI 검색 인덱스는 구조화된 데이터 컬렉션입니다. 다음 코드는 기술 자료에 대해 검색 가능한 콘텐츠를 저장하는 인덱스입니다.
인덱스 스키마에는 문서 식별 및 페이지 콘텐츠, 포함 및 숫자에 대한 필드가 포함됩니다. 또한 스키마에는 의미론적 순위 지정 및 벡터 검색에 대한 구성이 포함되어 있으며, text-embedding-3-large 배포를 사용하여 텍스트를 벡터화하고 의미론적 유사성에 따라 문서를 일치시킬 수 있습니다.
이 단계에 대한 자세한 내용은 Azure AI 검색 에이전트 검색에 대한 인덱스 만들기를 참조하세요.
from azure.search.documents.indexes import SearchIndexClient
from azure.search.documents.indexes.models import (
    AzureOpenAIVectorizer, AzureOpenAIVectorizerParameters,
    HnswAlgorithmConfiguration, SearchField, SearchIndex,
    SemanticConfiguration, SemanticField, SemanticPrioritizedFields,
    SemanticSearch, VectorSearch, VectorSearchProfile
)

index = SearchIndex(
    name=index_name,
    fields=[
        SearchField(name="id", type="Edm.String", key=True, filterable=True, sortable=True, facetable=True),
        SearchField(name="page_chunk", type="Edm.String", filterable=False, sortable=False, facetable=False),
        SearchField(name="page_embedding_text_3_large", type="Collection(Edm.Single)", stored=False, vector_search_dimensions=3072, vector_search_profile_name="hnsw_text_3_large"),
        SearchField(name="page_number", type="Edm.Int32", filterable=True, sortable=True, facetable=True)
    ],
    vector_search=VectorSearch(
        profiles=[VectorSearchProfile(name="hnsw_text_3_large", algorithm_configuration_name="alg", vectorizer_name="azure_openai_text_3_large")],
        algorithms=[HnswAlgorithmConfiguration(name="alg")],
        vectorizers=[
            AzureOpenAIVectorizer(
                vectorizer_name="azure_openai_text_3_large",
                parameters=AzureOpenAIVectorizerParameters(
                    resource_url=azure_openai_endpoint,
                    deployment_name=azure_openai_embedding_deployment,
                    model_name=azure_openai_embedding_model
                )
            )
        ]
    ),
    semantic_search=SemanticSearch(
        default_configuration_name="semantic_config",
        configurations=[
            SemanticConfiguration(
                name="semantic_config",
                prioritized_fields=SemanticPrioritizedFields(
                    content_fields=[
                        SemanticField(field_name="page_chunk")
                    ]
                )
            )
        ]
    )
)

index_client = SearchIndexClient(endpoint=endpoint, credential=credential)
index_client.create_or_update_index(index)
print(f"Index '{index_name}' created or updated successfully")
인덱스로 문서 업로드
현재 인덱스는 비어 있습니다. 다음 코드는 인덱스를 NASA의 어스 앳 나이트 전자책 JSON 문서로 채웁니다. Azure AI 검색 필요한 경우 각 문서는 인덱스 스키마에 정의된 필드 및 데이터 형식을 준수합니다.
이 단계에 대한 자세한 내용은 인덱스로 데이터 푸시를 참조하세요.
import requests
from azure.search.documents import SearchIndexingBufferedSender

url = "https://raw.githubusercontent.com/Azure-Samples/azure-search-sample-data/refs/heads/main/nasa-e-book/earth-at-night-json/documents.json"
documents = requests.get(url).json()

with SearchIndexingBufferedSender(endpoint=endpoint, index_name=index_name, credential=credential) as client:
    client.upload_documents(documents=documents)

print(f"Documents uploaded to index '{index_name}'")
기술 자료 만들기
기술 자료는 원본 데이터에 대한 재사용 가능한 참조입니다. 다음 코드는 이전에 만든 인덱스를 대상으로 하는 기술 자료를 만듭니다.
source_data_fields 는 인용 참조에 포함되는 인덱스 필드를 지정합니다. 이 예제에는 응답에 길고 해석할 수 없는 포함을 방지하기 위해 사람이 읽을 수 있는 필드만 포함됩니다.
이 단계에 대한 자세한 내용은 검색 인덱스 지식 원본 만들기를 참조하세요.
from azure.search.documents.indexes import SearchIndexClient
from azure.search.documents.indexes.models import (
    SearchIndexFieldReference, SearchIndexKnowledgeSource,
    SearchIndexKnowledgeSourceParameters
)

ks = SearchIndexKnowledgeSource(
    name=knowledge_source_name,
    description="Knowledge source for Earth at night data",
    search_index_parameters=SearchIndexKnowledgeSourceParameters(
        search_index_name=index_name,
        semantic_configuration_name="semantic_config",
        source_data_fields=[
            SearchIndexFieldReference(name="id"),
            SearchIndexFieldReference(name="page_chunk"),
            SearchIndexFieldReference(name="page_number")
        ]
    ),
)

index_client = SearchIndexClient(endpoint=endpoint, credential=credential)
index_client.create_or_update_knowledge_source(knowledge_source=ks)
print(f"Knowledge source '{knowledge_source_name}' created or updated successfully.")
기술 자료 만들기
다음 코드는 지식 소스에서 에이전트 기반 검색을 조율하는 지식 기반을 만듭니다. 또한 코드는 기술 자료의 MCP 엔드포인트를 저장합니다. 이 엔드포인트는 에이전트가 기술 자료에 액세스하는 데 사용합니다.
Foundry 에이전트 서비스와 통합하기 위해 기술 자료는 다음 매개 변수로 구성됩니다.
output_mode(미리 보기)는 추출 데이터로 설정되며, 에이전트에 근거 및 추론을 위해 처리되지 않은 축자 콘텐츠를 제공합니다. 대체 모드인 응답 합성은 에이전트가 원본 콘텐츠에 대해 추론하는 기능을 제한하는 미리 생성된 답변을 반환합니다.retrieval_reasoning_effort(미리 보기)는 비용 및 대기 시간을 줄이기 위해 LLM 기반 쿼리 계획을 우회하는 최소한의 노력으로 설정됩니다. 다른 추론 작업을 위해 지식 기반은 검색하기 전에 사용자 쿼리를 재구성하려 LLM을 사용합니다.
이 단계에 대한 자세한 내용은 Azure AI 검색 기술 자료 만들기를 참조하세요.
from azure.search.documents.indexes import SearchIndexClient
from azure.search.documents.indexes.models import KnowledgeBase, KnowledgeSourceReference
from azure.search.documents.knowledgebases.models import KnowledgeRetrievalMinimalReasoningEffort

knowledge_base = KnowledgeBase(
    name=base_name,
    knowledge_sources=[
        KnowledgeSourceReference(
            name=knowledge_source_name
        )
    ],
    output_mode="extractiveData",
    retrieval_reasoning_effort=KnowledgeRetrievalMinimalReasoningEffort()
)


index_client = SearchIndexClient(endpoint=endpoint, credential=credential)
index_client.create_or_update_knowledge_base(knowledge_base=knowledge_base)
print(f"Knowledge base '{base_name}' created or updated successfully")

mcp_endpoint = f"{endpoint.rstrip('/')}/knowledgebases/{base_name}/mcp?api-version=2026-08-01-preview"
프로젝트 클라이언트 설정
AIProjectClient를 사용하여 Microsoft Foundry 프로젝트에 대한 클라이언트 연결을 만듭니다. 프로젝트에 아직 에이전트가 없을 수도 있지만 이 자습서를 이미 완료한 경우 에이전트가 여기에 나열됩니다.
from azure.ai.projects import AIProjectClient

project_client = AIProjectClient(endpoint=project_endpoint, credential=credential)

list(project_client.agents.list())
프로젝트 연결 만들기
다음 코드는 Microsoft Foundry에서 지식 베이스의 MCP 엔드포인트를 가리키는 RemoteTool 프로젝트 연결(미리 보기)을 생성합니다. 이 연결은 프로젝트 관리 ID를 사용하여 Azure AI 검색 인증합니다.
import requests
from azure.identity import get_bearer_token_provider

bearer_token_provider = get_bearer_token_provider(credential, "https://management.azure.com/.default")
headers = {
    "Authorization": f"Bearer {bearer_token_provider()}",
}

response = requests.put(
    f"https://management.azure.com{project_resource_id}/connections/{project_connection_name}?api-version=2025-10-01-preview",
    headers=headers,
    json={
        "name": project_connection_name,
        "type": "Microsoft.MachineLearningServices/workspaces/connections",
        "properties": {
            "authType": "ProjectManagedIdentity",
            "category": "RemoteTool",
            "target": mcp_endpoint,
            "isSharedToAll": True,
            "audience": "https://search.azure.com/",
            "metadata": { "ApiType": "Azure" }
        }
    }
)

response.raise_for_status()
print(f"Connection '{project_connection_name}' created or updated successfully.")
MCP 도구를 사용하여 에이전트 만들기
Warning
MCP 구현은 공격, 연속 실패 및 사용자 감독 손실과 같은 위험에 취약합니다. Microsoft 권장 사례 및 사용 모범 사례에 따라 보안 및 안정성에 대한 MCP 서버를 검사하고 승인 메커니즘을 구현하고 연속 동작을 모니터링하여 이러한 위험을 완화할 수 있습니다.
다음 코드는 MCP 도구로 구성된 에이전트를 만듭니다. 에이전트가 사용자 쿼리를 받으면 MCP 도구를 통해 기술 자료를 호출하여 응답 접지에 대한 관련 콘텐츠를 검색할 수 있습니다.
에이전트 정의에는 이전에 만든 프로젝트 연결 및 동작을 지정하는 지침이 포함됩니다. 실험에 따라 이러한 지침은 기술 자료 호출의 정확도를 극대화하고 적절한 인용 서식을 보장하는 데 효과적입니다.
이 단계에 대한 자세한 내용은 빠른 시작: 새 에이전트 만들기를 참조하세요.
from azure.ai.projects.models import PromptAgentDefinition, MCPTool

instructions = """
You are a helpful assistant that must use the knowledge base to answer all the questions from user. You must never answer from your own knowledge under any circumstances.
Every answer must always provide annotations for using the MCP knowledge base tool and render them as: `【message_idx:search_idx†source_name】`
If you cannot find the answer in the provided knowledge base you must respond with "I don't know".
"""

mcp_kb_tool = MCPTool(
    server_label="knowledge-base",
    server_url=mcp_endpoint,
    require_approval="never",
    allowed_tools=["knowledge_base_retrieve"],
    project_connection_id=project_connection_name
)

agent = project_client.agents.create_version(
    agent_name=agent_name,
    definition=PromptAgentDefinition(
        model=agent_model,
        instructions=instructions,
        tools=[mcp_kb_tool]
    )
)

print(f"AI agent '{agent_name}' created or updated successfully")
(선택 사항) 요청별 헤더를 사용하여 사용 권한 적용
사용 권한으로 보호된 콘텐츠가 포함된 지식 원본이 있는 경우 검색 엔진은 각 사용자가 액세스 권한이 부여된 문서만 볼 수 있도록 결과를 필터링할 수 있습니다. 이 필터링을 사용하도록 설정하려면 MCP 도구 연결의 헤더에 로그인한 x-ms-query-source-authorization 사용자의 ID 토큰을 전달합니다. 토큰이 없으면 사용 권한 사용 원본은 필터링되지 않은 결과를 반환합니다. 자세한 내용은 쿼리 시 사용 권한 적용(미리 보기)을 참조하세요.
각 호출에서 다른 사용자의 토큰을 전달하는 등 요청당 MCP 헤더를 변경하려면 에이전트 정의에서 구조화된 입력을 선언하고 도구의 headers입력으로 {{placeholder}} 참조합니다. 호출자는 각 호출에 대한 값을 제공합니다. 이 방법은 프로젝트 연결에 바인딩된 MCP 도구에서 작동합니다.
MCP 서버에 대한 사용자별 권한 부여의 경우 OAuth ID 통과를 사용할 수도 있습니다.
다음 코드는 MCP 도구가 구조화된 입력에서 권한 부여 헤더를 읽도록 이전 단계의 에이전트를 업데이트합니다.
from azure.ai.projects.models import StructuredInputDefinition

# Reference the token as a placeholder in the header
mcp_kb_tool = MCPTool(
    server_label="knowledge-base",
    server_url=mcp_endpoint,
    require_approval="never",
    allowed_tools=["knowledge_base_retrieve"],
    project_connection_id=project_connection_name,
    headers={
        "x-ms-query-source-authorization": "{{search_auth_token}}"
    }
)

# Declare the structured input so the caller can supply the token per request
agent = project_client.agents.create_version(
    agent_name=agent_name,
    definition=PromptAgentDefinition(
        model=agent_model,
        instructions=instructions,
        tools=[mcp_kb_tool],
        structured_inputs={
            "search_auth_token": StructuredInputDefinition(
                description="Per-user Azure AI Search bearer token",
                required=True,
                schema={"type": "string"},
            )
        }
    )
)

print(f"AI agent '{agent_name}' created or updated successfully")
에이전트를 호출할 때 Azure AI 검색 토큰structured_inputs을 제공합니다. 이 예제는 현재 credential에서 토큰을 확인합니다. 다중 사용자 앱의 경우 로그인한 각 사용자의 토큰을 대신 전달합니다. 예를 들어 검색 엔진이 해당 사용자에 대한 검색 결과를 필터링할 수 있도록 on-behalf-of 흐름을 통해 얻은 토큰을 사용하세요.
# Resolve an Azure AI Search token from the current credential (use a per-user token in production)
from azure.identity import get_bearer_token_provider

search_token = get_bearer_token_provider(credential, "https://search.azure.com/.default")()

openai_client = project_client.get_openai_client()
conversation = openai_client.conversations.create()

response = openai_client.responses.create(
    conversation=conversation.id,
    tool_choice="required",
    input="{user_query}",
    extra_body={
        "agent_reference": {"name": agent.name, "type": "agent_reference"},
        "structured_inputs": {"search_auth_token": search_token},
    },
)

print(f"Response: {response.output_text}")
에이전트와 채팅
클라이언트 앱은 Azure OpenAI의 대화 및 Responses API를 사용하여 에이전트와 상호 작용합니다.
다음 코드는 대화를 만들고 일반적인 채팅 환경과 유사한 사용자 메시지를 에이전트에 전달합니다. 에이전트는 MCP 도구를 통해 기술 자료를 호출할 시기를 결정하고 참조가 포함된 자연어 답변을 반환합니다. 설정 tool_choice="required" 하면 에이전트가 쿼리를 처리할 때 항상 기술 자료 도구를 사용합니다.
# Get the OpenAI client for responses and conversations
openai_client = project_client.get_openai_client()

conversation = openai_client.conversations.create()

# Send initial request that will trigger the MCP tool
response = openai_client.responses.create(
    conversation=conversation.id,
    tool_choice="required",
    input="""
        Why do suburban belts display larger December brightening than urban cores even though absolute light levels are higher downtown?
        Why is the Phoenix nighttime street grid is so sharply visible from space, whereas large stretches of the interstate between midwestern cities remain comparatively dim?
    """,
    extra_body={"agent_reference": {"name": agent.name, "type": "agent_reference"}},
)

print(f"Response: {response.output_text}")
응답은 다음 예제와 유사해야 합니다.
Response: Here are evidence-based explanations to your questions:

---

**1. Why do suburban belts display larger December brightening than urban cores, even though absolute light levels are higher downtown?**

- Suburban belts show a *larger percentage increase* in night brightness during December compared to urban cores, largely because suburban residential areas feature more single-family homes and larger yards, which are typically decorated with holiday lights. These areas start from a lower baseline (less bright overall at night compared to dense urban centers), so the relative change (brightening) is much more noticeable.

- In contrast, the downtown core is already very bright at night due to dense commercial lighting and streetlights. While it also sees a December increase (often 20–30% brighter), the *absolute* change is less striking because it begins at a much higher base of illumination.

- This pattern is observed across U.S. cities, with the phenomenon driven by widespread cultural practices and the suburban landscape’s suitability for holiday lighting displays. The effect is visible in satellite data and was quantified at 20–50% brighter in December, especially in suburbs and city outskirts.

---

**2. Why is the Phoenix nighttime street grid so sharply visible from space, whereas large stretches of the interstate between midwestern cities remain comparatively dim?**

- Phoenix’s sharply visible nighttime street grid from space is a result of its urban layout: the city (like many western U.S. cities) was developed using a regular grid system, with extensive and uniform street lighting and strong urban sprawl. The grid pattern, and the dense network of intersecting surface streets, is brightly illuminated, particularly at intersections, commercial areas, and major thoroughfares.

- The interstate highways between midwestern cities, though significant in length and crucial to national infrastructure, traverse sparsely populated rural areas. These stretches typically have very little artificial lighting (due to low traffic volumes at night and cost considerations), making them much less visible in nighttime satellite imagery. Only nodes (cities and towns) along the route show as bright "pearls" in the darkness, while the "strings" (highways) connecting them remain faint or invisible.

- In summary:
  - Urban areas like Phoenix stand out with strong, connected patterns of light due to dense development and extensive lighting.
  - Rural interstates are sparsely lit, and only their endpoints—cities and large towns—generate notable light visible from space.

---

**References**:
- [Holiday Lights increase most dramatically in suburbs, not downtowns: earth_at_night_508_page_176_verbalized, page 160](4:5)
- [Lighting paths and urban grids are visible from space, while rural highways remain dim: earth_at_night_508_page_124_verbalized, page 108](4:3)
- [Phoenix’s grid and surrounding urban structure: earth_at_night_508_page_104_verbalized, page 88](4:1)
응답 검사
에이전트의 기본 응답에는 기술 자료로 전송된 쿼리 및 찾은 인용에 대한 메타데이터가 포함됩니다. 이 메타데이터를 검사하여 에이전트가 사용자 입력을 처리하는 방법을 이해할 수 있습니다.
response.to_dict()
리소스 정리
사용자 고유의 구독에서 작업하는 경우 더 이상 필요하지 않은 리소스를 제거하여 프로젝트를 완료하는 것이 좋습니다. 계속 실행 중인 리소스는 비용이 들 수 있습니다.
Azure 포털의 왼쪽 창에서 모든 리소스 또는 리소스 그룹을 선택하여 리소스를 찾고 관리합니다. 리소스를 개별적으로 삭제하거나 리소스 그룹을 삭제하여 모든 리소스를 한 번에 제거할 수 있습니다.
다음 코드를 실행하여 개별 개체를 삭제할 수도 있습니다.
# Delete the agent
project_client.agents.delete_version(agent.name, agent.version)
print(f"AI agent '{agent.name}' version '{agent.version}' deleted successfully")

# Delete the knowledge base
index_client.delete_knowledge_base(base_name)
print(f"Knowledge base '{base_name}' deleted successfully")

# Delete the knowledge source
index_client.delete_knowledge_source(knowledge_source=knowledge_source_name)
print(f"Knowledge source '{knowledge_source_name}' deleted successfully.")

# Delete the search index
index_client.delete_index(index_name)
print(f"Index '{index_name}' deleted successfully")
데이터 품질 향상
기본적으로 기술 자료의 검색 결과는 접지용 에이전트에 전달할 수 있는 크고 통합된 문자열로 통합됩니다. Azure AI 검색 고품질 결과를 생성하는 데 도움이 되는 다음과 같은 인덱싱 및 관련성 튜닝 기능을 제공합니다. 검색 인덱스에 이러한 기능을 구현할 수 있으며 검색 관련성의 향상된 기능은 검색 응답의 품질에서 분명하게 드러납니다.
점수 매기기 프로필 은 기본 제공된 부스팅 기준을 제공합니다. 인덱스는 쿼리에 해당 프로필과 연결된 필드가 포함될 때 검색 엔진에서 사용하는 기본 점수 매기기 프로필을 지정해야 합니다.
의미 체계 구성 이 필요하지만 우선 순위를 지정하고 순위에 사용되는 필드를 결정합니다.
일반 텍스트 콘텐츠의 경우 분석기를 사용하여 인덱싱 중에 토큰화를 제어할 수 있습니다.
멀티모달 또는 이미지 콘텐츠의 경우 인덱싱 중에 기술 세트를 통해 이미지에 대한 LLM이 생성한 설명에 이미지 구두화를 사용할 수 있으며, 고전적인 OCR 및 이미지 분석도 가능합니다.
하위 쿼리 수 제어
기술 자료에서 검색 추론 작업(미리 보기)을 설정 하여 하위 쿼리 수를 제어할 수 있습니다. 추론 작업은 최소(LLM 처리 없음)에서 중간(심층 검색 및 후속 반복)에 이르기까지 쿼리 계획에 대한 LLM 처리 수준을 결정합니다.
최소가 아닌 추론 작업의 경우 LLM은 다음 요인에 따라 하위 쿼리 수를 결정합니다.
- 사용자 쿼리
- 채팅 기록
- 의미 체계 순위 입력 제약 조건
에이전트에 전송된 컨텍스트 제어
응답 API는 에이전트 및 기술 자료로 전송되는 내용을 제어합니다. 성능 및 관련성을 최적화하려면 MCP 도구로 보내기 전에 에이전트 지침을 조정하여 채팅 기록을 요약하거나 필터링합니다.
비용 제어 및 작업 제한
쿼리 계획에 대한 인사이트를 보려면 기술 자료 응답의 활동 배열 에서 출력 토큰을 확인합니다.
성능 향상
성능을 최적화하고 대기 시간을 줄이려면 다음 전략을 고려하세요.
메시지 스레드를 요약합니다.
더 빠르게 수행하는 모델 또는
gpt-5-mini처럼 더 작은 모델을 사용하십시오.maxOutputSize에서 검색 작업을 설정하여 응답 크기를 제어하거나,maxRuntimeInSeconds를 사용하여 시간 제한 처리를 수행합니다.인덱싱하기 전에 큰 문서를 더 작은 조각으로 청크합니다. 출력 예산을 초과하는 문서는 기본 결과에서 자동으로 생략할 수 있습니다.