你当前正在访问 Microsoft Azure Global Edition 技术文档网站。 如果需要访问由世纪互联运营的 Microsoft Azure 中国技术文档网站,请访问 https://docs.azure.cn。
注意
Azure AI 搜索可通过Azure门户、REST API 和Azure SDK获取。 它也是 Foundry IQ 的基础;Foundry IQ 是一个托管式知识层,可将企业内容转化为供 Microsoft Foundry 门户中的智能体使用的、可复用且具备权限感知能力的知识库。
重要
标记为“预览”的特性、功能或属性不受服务级别协议 (SLA) 保障,不建议用于生产工作负载,并且在正式发布之前可能会更改或受到限制。 Azure AI 搜索预览条款适用于所有预览功能,无论是独立功能还是正式版功能的一部分。
了解如何创建一个支持 MCP 的智能解决方案,该解决方案将 Azure AI 搜索 与 Foundry 代理服务集成,以实现 agentic 检索。 可以将此体系结构用于需要对大型知识域进行复杂推理的对话应用程序,例如客户支持或技术故障排除。
本教程在两个位置使用预览版 REST API 图面。 知识库使用 output_mode 和 retrieval_reasoning_effort(预览版)显式指定抽取式输出和最小推理,尽管等效行为已正式发布。 项目连接使用RemoteTool(预览版)和项目托管标识对Azure AI 搜索进行身份验证。
在本教程中,你将:
- 为 Azure AI 搜索 和 Microsoft Foundry 配置基于角色的访问
- 在 Azure AI 搜索 中创建搜索索引、知识源和知识库
- 创建项目连接,以便在 Azure AI 搜索 与 Microsoft Foundry 之间进行 MCP 通信
- 在 Microsoft Foundry 中创建代理,该代理使用 MCP 工具进行检索
- 通过与代理聊天来测试解决方案
- 查看优化解决方案的提示
提示
想要立即开始? 在 GitHub 上克隆 agentic-retrieval-pipeline-example Python 笔记本。 笔记本包含本教程中的代码,以可直接运行的格式。
有关侧重于入站和出站专用连接验证的专用部署路径,请参阅 教程:为 Foundry IQ 部署专用代理检索。
先决条件
在任何区域内提供代理检索的 Azure AI 搜索服务。
Microsoft Foundry 项目和资源。 创建项目时,会自动创建资源。
部署在您的项目中的文本嵌入模型,用于 查询时向量化。 此解决方案使用
text-embedding-3-large。为代理部署到项目的 LLM。 此解决方案使用
gpt-5-mini。GPT-4 系列模型已弃用。 有关 Microsoft Foundry 中的停用日期和当前状态,请参阅模型停用计划 - Microsoft Foundry。
访问和管理Azure AI 搜索和Microsoft Foundry 资源的权限。 有关详细信息,请参阅 “配置访问权限”。
Python 3.8 或更高版本。
Visual Studio Code,带有 Python 和 Jupyter 扩展。
使用 Microsoft Entra ID 进行无密钥身份验证的 Azure CLI。
重要
如果禁用搜索服务的公用网络访问并将其用作具有网络隔离Microsoft Foundry 资源的代理工具,则必须使用 Microsoft Foundry (新) 门户、SDK 或 CLI 生成代理。 Microsoft Foundry(经典)门户不支持此方案。 有关详细信息,请参阅 具有网络隔离的代理工具。
了解解决方案
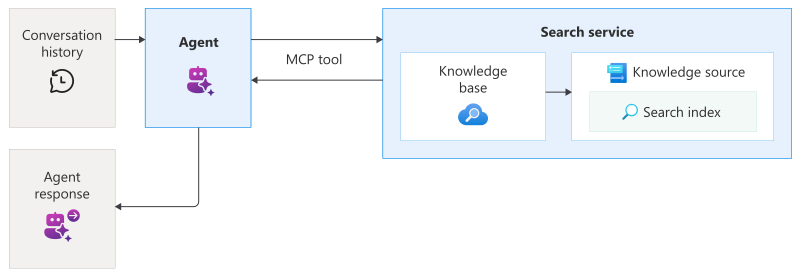
此解决方案结合了 Azure AI 搜索 和 Microsoft Foundry 来创建端到端检索管道:
Azure AI 搜索托管知识库,用于处理查询规划、查询执行和结果合成。 创建搜索索引来存储内容、引用索引的知识源,以及从知识源执行混合检索的知识库。
Microsoft Foundry托管 Azure OpenAI 模型部署、项目连接和代理。 创建指向知识库 MCP 终结点的项目连接,然后创建使用 MCP 工具访问知识库的代理。
用户通过与调用代理的客户端应用(如聊天机器人)交互来启动查询处理。 代理使用 MCP 工具协调对知识库的请求并合成响应。 聊天机器人调用代理时,MCP 工具会在Azure AI 搜索中调用知识库,并将响应发送到代理和聊天机器人。
配置访问权限
在开始之前,请确保你有权访问内容和操作。 我们建议使用 Microsoft Entra ID 进行身份验证,并使用基于角色的访问控制进行授权。 你必须是 所有者 或 用户访问管理员 才能分配角色。 如果角色不可行,请改用 基于密钥的身份验证 。
若要为此解决方案配置访问权限,请执行以下操作:
登录到 Azure 门户。
为您的项目和搜索服务启用系统分配的托管标识。 可以在每个资源的 “标识 ”页上执行此操作。
-
作用 被分配者 目的 搜索服务参与者 用户帐户 创建对象 搜索引索数据贡献者 用户帐户 加载数据 搜索索引数据读取器 用户帐户和项目托管标识 读取索引内容 在项目的父资源上,分配以下角色。
作用 被分配者 目的 Foundry 用户 用户帐户 访问模型部署并创建代理 Foundry 项目经理 用户帐户 在代理中创建项目连接并使用 MCP 工具 认知服务用户 搜索服务托管标识 访问知识库
重要
Foundry RBAC 角色最近已更名。 Foundry 用户、Foundry 所有者、Foundry 帐户所有者和 Foundry 项目经理之前的名称分别为“Azure AI 用户”、“Azure AI 所有者”、“Azure AI 帐户所有者”和“Azure AI 项目经理”。 在重命名推出时,你仍可能会在某些位置看到以前的名称。重命名后,角色 ID 和核心权限保持不变。
设置环境
创建在本地系统上命名
tutorial-agentic-retrieval的文件夹。在 Visual Studio Code 中打开文件夹。
选择 View>Command Palette,然后选择Python:创建环境。 按照提示创建虚拟环境。
选择“终端”“新终端”>。
安装所需的包。
pip install azure-ai-projects==2.0.0b1 azure-mgmt-cognitiveservices azure-identity ipykernel python-dotenv azure-search-documents==11.7.0b2 requests openai在
.env文件夹中创建名为tutorial-agentic-retrieval的文件。将以下变量添加到
.env文件中,将占位符值替换为你自己的值。AZURE_SEARCH_ENDPOINT = https://{your-service-name}.search.windows.net PROJECT_ENDPOINT = https://{your-resource-name}.services.ai.azure.com/api/projects/{your-project-name} PROJECT_RESOURCE_ID = /subscriptions/{subscription-id}/resourceGroups/{resource-group-name}/providers/Microsoft.CognitiveServices/accounts/{account-name}/projects/{project-name} AZURE_OPENAI_ENDPOINT = https://{your-resource-name}.openai.azure.com AZURE_OPENAI_EMBEDDING_DEPLOYMENT = text-embedding-3-large AGENT_MODEL = gpt-5-mini可以在Azure门户中找到终结点和资源 ID:
AZURE_SEARCH_ENDPOINT位于搜索服务的 “概述 ”页上。PROJECT_ENDPOINT位于项目的 “终结点 ”页上。PROJECT_RESOURCE_ID位于项目的 “属性” 页上。AZURE_OPENAI_ENDPOINT位于项目的父资源的 “终结点 ”页上。
若要使用 Microsoft Entra ID 进行无密钥身份验证,请登录到Azure帐户。 如果有多个订阅,请选择包含Azure AI 搜索和Microsoft Foundry 资源的订阅。
az login在
tutorial.ipynb文件夹中创建名为tutorial-agentic-retrieval的文件。 在下一部分中,将代码单元格添加到此文件。
生成解决方案
在本部分中,将创建代理检索解决方案的组件。 将每个代码片段添加到笔记本中的 tutorial.ipynb 单独代码单元,并按顺序运行单元格。
本节中的步骤包括:
加载连接
以下代码从 .env 文件加载环境变量,并建立与 Azure AI 搜索 和 Microsoft Foundry 的连接。
import os

from azure.identity import DefaultAzureCredential
from azure.mgmt.core.tools import parse_resource_id
from dotenv import load_dotenv

load_dotenv(override=True) # Take environment variables from .env

project_endpoint = os.environ["PROJECT_ENDPOINT"]
project_resource_id = os.environ["PROJECT_RESOURCE_ID"]
project_connection_name = os.getenv("PROJECT_CONNECTION_NAME", "earthknowledgeconnection")
agent_model = os.getenv("AGENT_MODEL", "gpt-5-mini")
agent_name = os.getenv("AGENT_NAME", "earth-knowledge-agent")
endpoint = os.environ["AZURE_SEARCH_ENDPOINT"]
credential = DefaultAzureCredential()
knowledge_source_name = os.getenv("AZURE_SEARCH_KNOWLEDGE_SOURCE_NAME", "earth-knowledge-source")
index_name = os.getenv("AZURE_SEARCH_INDEX", "earth-at-night")
azure_openai_endpoint = os.environ["AZURE_OPENAI_ENDPOINT"]
azure_openai_embedding_deployment = os.getenv("AZURE_OPENAI_EMBEDDING_DEPLOYMENT", "text-embedding-3-large")
azure_openai_embedding_model = os.getenv("AZURE_OPENAI_EMBEDDING_MODEL", "text-embedding-3-large")
base_name = os.getenv("AZURE_SEARCH_AGENT_NAME", "earth-knowledge-base")

# Parse the resource ID to extract subscription and other components
parsed_resource_id = parse_resource_id(project_resource_id)
subscription_id = parsed_resource_id['subscription']
resource_group = parsed_resource_id['resource_group']
account_name = parsed_resource_id['name']
project_name = parsed_resource_id['child_name_1']
创建搜索索引
在Azure AI 搜索中,索引是结构化数据集合。 以下代码创建索引来存储知识库的可搜索内容。
索引架构包含文档标识和页面内容、嵌入和数字的字段。 该架构还包括语义排名和矢量搜索的配置,该配置使用部署 text-embedding-3-large 根据语义相似性向量化文本和匹配文档。
有关此步骤的详细信息,请参阅 创建索引以在 Azure AI 搜索 进行代理检索。
from azure.search.documents.indexes import SearchIndexClient
from azure.search.documents.indexes.models import (
    AzureOpenAIVectorizer, AzureOpenAIVectorizerParameters,
    HnswAlgorithmConfiguration, SearchField, SearchIndex,
    SemanticConfiguration, SemanticField, SemanticPrioritizedFields,
    SemanticSearch, VectorSearch, VectorSearchProfile
)

index = SearchIndex(
    name=index_name,
    fields=[
        SearchField(name="id", type="Edm.String", key=True, filterable=True, sortable=True, facetable=True),
        SearchField(name="page_chunk", type="Edm.String", filterable=False, sortable=False, facetable=False),
        SearchField(name="page_embedding_text_3_large", type="Collection(Edm.Single)", stored=False, vector_search_dimensions=3072, vector_search_profile_name="hnsw_text_3_large"),
        SearchField(name="page_number", type="Edm.Int32", filterable=True, sortable=True, facetable=True)
    ],
    vector_search=VectorSearch(
        profiles=[VectorSearchProfile(name="hnsw_text_3_large", algorithm_configuration_name="alg", vectorizer_name="azure_openai_text_3_large")],
        algorithms=[HnswAlgorithmConfiguration(name="alg")],
        vectorizers=[
            AzureOpenAIVectorizer(
                vectorizer_name="azure_openai_text_3_large",
                parameters=AzureOpenAIVectorizerParameters(
                    resource_url=azure_openai_endpoint,
                    deployment_name=azure_openai_embedding_deployment,
                    model_name=azure_openai_embedding_model
                )
            )
        ]
    ),
    semantic_search=SemanticSearch(
        default_configuration_name="semantic_config",
        configurations=[
            SemanticConfiguration(
                name="semantic_config",
                prioritized_fields=SemanticPrioritizedFields(
                    content_fields=[
                        SemanticField(field_name="page_chunk")
                    ]
                )
            )
        ]
    )
)

index_client = SearchIndexClient(endpoint=endpoint, credential=credential)
index_client.create_or_update_index(index)
print(f"Index '{index_name}' created or updated successfully")
将文档上传到索引
目前,索引为空。 以下代码使用来自 NASA 地球的夜间电子书中的 JSON 文档填充索引。 根据Azure AI 搜索的要求,每个文档都符合索引架构中定义的字段和数据类型。
有关此步骤的详细信息,请参阅 将数据推送到索引。
import requests
from azure.search.documents import SearchIndexingBufferedSender

url = "https://raw.githubusercontent.com/Azure-Samples/azure-search-sample-data/refs/heads/main/nasa-e-book/earth-at-night-json/documents.json"
documents = requests.get(url).json()

with SearchIndexingBufferedSender(endpoint=endpoint, index_name=index_name, credential=credential) as client:
    client.upload_documents(documents=documents)

print(f"Documents uploaded to index '{index_name}'")
创建知识源
知识源是对源数据的可重用引用。 以下代码创建一个知识源,目标是您已创建的索引。
source_data_fields 指定引文引用中包含哪些索引字段。 此示例仅包含人类可读字段,以避免响应中出现冗长且无法解读的嵌入。
有关此步骤的详细信息,请参阅 创建搜索索引知识源。
from azure.search.documents.indexes import SearchIndexClient
from azure.search.documents.indexes.models import (
    SearchIndexFieldReference, SearchIndexKnowledgeSource,
    SearchIndexKnowledgeSourceParameters
)

ks = SearchIndexKnowledgeSource(
    name=knowledge_source_name,
    description="Knowledge source for Earth at night data",
    search_index_parameters=SearchIndexKnowledgeSourceParameters(
        search_index_name=index_name,
        semantic_configuration_name="semantic_config",
        source_data_fields=[
            SearchIndexFieldReference(name="id"),
            SearchIndexFieldReference(name="page_chunk"),
            SearchIndexFieldReference(name="page_number")
        ]
    ),
)

index_client = SearchIndexClient(endpoint=endpoint, credential=credential)
index_client.create_or_update_knowledge_source(knowledge_source=ks)
print(f"Knowledge source '{knowledge_source_name}' created or updated successfully.")
创建知识库
以下代码创建一个知识库,用于协调从知识源进行主动检索。 该代码还存储知识库的 MCP 终结点,代理将使用该终结点访问知识库。
为了与 Foundry 代理服务集成,知识库配置了以下参数:
output_mode(预览版)设置为抽取数据,为智能体提供未经处理的原文内容,作为事实依据并用于推理。 替代模式答案合成返回预生成的答案,这些答案限制了代理在源内容上推理的能力。retrieval_reasoning_effort(预览版)设置为最小工作量,从而绕过基于 LLM 的查询计划来降低成本和延迟。 对于其他推理工作,知识库在检索之前使用大语言模型(LLM)重新制定用户查询。
有关此步骤的详细信息,请参阅 在 Azure AI 搜索 中创建知识库。
from azure.search.documents.indexes import SearchIndexClient
from azure.search.documents.indexes.models import KnowledgeBase, KnowledgeSourceReference
from azure.search.documents.knowledgebases.models import KnowledgeRetrievalMinimalReasoningEffort

knowledge_base = KnowledgeBase(
    name=base_name,
    knowledge_sources=[
        KnowledgeSourceReference(
            name=knowledge_source_name
        )
    ],
    output_mode="extractiveData",
    retrieval_reasoning_effort=KnowledgeRetrievalMinimalReasoningEffort()
)


index_client = SearchIndexClient(endpoint=endpoint, credential=credential)
index_client.create_or_update_knowledge_base(knowledge_base=knowledge_base)
print(f"Knowledge base '{base_name}' created or updated successfully")

mcp_endpoint = f"{endpoint.rstrip('/')}/knowledgebases/{base_name}/mcp?api-version=2026-08-01-preview"
设置项目客户端
使用 AIProjectClient 创建与 Microsoft Foundry 项目的客户端连接。 项目可能尚不包含任何代理,但如果已完成本教程,则此处列出了代理。
from azure.ai.projects import AIProjectClient

project_client = AIProjectClient(endpoint=project_endpoint, credential=credential)

list(project_client.agents.list())
创建项目连接
以下代码将在 Microsoft Foundry 中创建一个 RemoteTool项目连接(预览),该连接指向你的知识库的 MCP 终结点。 此连接使用项目托管标识对Azure AI 搜索进行身份验证。
import requests
from azure.identity import get_bearer_token_provider

bearer_token_provider = get_bearer_token_provider(credential, "https://management.azure.com/.default")
headers = {
    "Authorization": f"Bearer {bearer_token_provider()}",
}

response = requests.put(
    f"https://management.azure.com{project_resource_id}/connections/{project_connection_name}?api-version=2025-10-01-preview",
    headers=headers,
    json={
        "name": project_connection_name,
        "type": "Microsoft.MachineLearningServices/workspaces/connections",
        "properties": {
            "authType": "ProjectManagedIdentity",
            "category": "RemoteTool",
            "target": mcp_endpoint,
            "isSharedToAll": True,
            "audience": "https://search.azure.com/",
            "metadata": { "ApiType": "Azure" }
        }
    }
)

response.raise_for_status()
print(f"Connection '{project_connection_name}' created or updated successfully.")
使用 MCP 工具创建代理
Warning
MCP 实现容易受到攻击、级联失败和人员监督损失等风险的影响。 你可以通过对 MCP 服务器的安全性和可靠性进行审查,遵循Microsoft 建议的做法和行业最佳实践,并实施审批机制以及监控级联行为,来降低这些风险。
以下代码创建使用 MCP 工具配置的代理。 当代理收到用户查询时,它可以通过 MCP 工具调用知识库,以检索用于支撑响应的相关内容。
代理定义包括指定其行为的说明和之前创建的项目连接。 根据我们的试验,这些说明在最大程度地提高知识库调用的准确性并确保正确的引文格式方面是有效的。
有关此步骤的详细信息,请参阅 快速入门:创建新代理。
from azure.ai.projects.models import PromptAgentDefinition, MCPTool

instructions = """
You are a helpful assistant that must use the knowledge base to answer all the questions from user. You must never answer from your own knowledge under any circumstances.
Every answer must always provide annotations for using the MCP knowledge base tool and render them as: `【message_idx:search_idx†source_name】`
If you cannot find the answer in the provided knowledge base you must respond with "I don't know".
"""

mcp_kb_tool = MCPTool(
    server_label="knowledge-base",
    server_url=mcp_endpoint,
    require_approval="never",
    allowed_tools=["knowledge_base_retrieve"],
    project_connection_id=project_connection_name
)

agent = project_client.agents.create_version(
    agent_name=agent_name,
    definition=PromptAgentDefinition(
        model=agent_model,
        instructions=instructions,
        tools=[mcp_kb_tool]
    )
)

print(f"AI agent '{agent_name}' created or updated successfully")
(可选)使用每个请求标头强制实施权限
如果任何知识源包含受权限保护的内容,检索引擎可以筛选结果,以便每个用户仅看到他们有权访问的文档。 若要启用此筛选功能,请在 MCP 工具连接的 x-ms-query-source-authorization 标头中转发已登录用户的身份令牌。 如果没有令牌,启用权限的源将返回未筛选的结果。 有关详细信息,请参阅在查询时强制实施权限(预览版)。
若要改变每个请求的 MCP 标头,例如在每个调用中传递其他用户的令牌,请在代理定义中声明结构化输入并将其引用为工具headers中的一个{{placeholder}}。 调用方在每次调用时提供该值。 此方法适用于绑定到项目连接的 MCP 工具。
对于针对 MCP 服务器的按用户授权,您还可以使用OAuth 身份透传。
以下代码从上一步更新代理,以便 MCP 工具从结构化输入读取其授权标头。
from azure.ai.projects.models import StructuredInputDefinition

# Reference the token as a placeholder in the header
mcp_kb_tool = MCPTool(
    server_label="knowledge-base",
    server_url=mcp_endpoint,
    require_approval="never",
    allowed_tools=["knowledge_base_retrieve"],
    project_connection_id=project_connection_name,
    headers={
        "x-ms-query-source-authorization": "{{search_auth_token}}"
    }
)

# Declare the structured input so the caller can supply the token per request
agent = project_client.agents.create_version(
    agent_name=agent_name,
    definition=PromptAgentDefinition(
        model=agent_model,
        instructions=instructions,
        tools=[mcp_kb_tool],
        structured_inputs={
            "search_auth_token": StructuredInputDefinition(
                description="Per-user Azure AI Search bearer token",
                required=True,
                schema={"type": "string"},
            )
        }
    )
)

print(f"AI agent '{agent_name}' created or updated successfully")
调用代理时,请在structured_inputs中提供 Azure AI 搜索 令牌。 此示例从当前 credential 解析出一个令牌。 对于多用户应用,请改为传递每个已登录用户的令牌。 例如,使用通过代理流获取的令牌,以便检索引擎可以筛选该用户的结果。
# Resolve an Azure AI Search token from the current credential (use a per-user token in production)
from azure.identity import get_bearer_token_provider

search_token = get_bearer_token_provider(credential, "https://search.azure.com/.default")()

openai_client = project_client.get_openai_client()
conversation = openai_client.conversations.create()

response = openai_client.responses.create(
    conversation=conversation.id,
    tool_choice="required",
    input="{user_query}",
    extra_body={
        "agent_reference": {"name": agent.name, "type": "agent_reference"},
        "structured_inputs": {"search_auth_token": search_token},
    },
)

print(f"Response: {response.output_text}")
与代理聊天
客户端应用使用来自 Azure OpenAI 的 Conversations 和 Responses API 与代理交互。
以下代码创建聊天并将用户消息传递给代理,类似于典型的聊天体验。 代理确定何时通过 MCP 工具调用知识库,并使用引用返回自然语言答案。 设置 tool_choice="required" 可确保代理在处理查询时始终使用知识库工具。
# Get the OpenAI client for responses and conversations
openai_client = project_client.get_openai_client()

conversation = openai_client.conversations.create()

# Send initial request that will trigger the MCP tool
response = openai_client.responses.create(
    conversation=conversation.id,
    tool_choice="required",
    input="""
        Why do suburban belts display larger December brightening than urban cores even though absolute light levels are higher downtown?
        Why is the Phoenix nighttime street grid is so sharply visible from space, whereas large stretches of the interstate between midwestern cities remain comparatively dim?
    """,
    extra_body={"agent_reference": {"name": agent.name, "type": "agent_reference"}},
)

print(f"Response: {response.output_text}")
响应应类似于以下示例。
Response: Here are evidence-based explanations to your questions:

---

**1. Why do suburban belts display larger December brightening than urban cores, even though absolute light levels are higher downtown?**

- Suburban belts show a *larger percentage increase* in night brightness during December compared to urban cores, largely because suburban residential areas feature more single-family homes and larger yards, which are typically decorated with holiday lights. These areas start from a lower baseline (less bright overall at night compared to dense urban centers), so the relative change (brightening) is much more noticeable.

- In contrast, the downtown core is already very bright at night due to dense commercial lighting and streetlights. While it also sees a December increase (often 20–30% brighter), the *absolute* change is less striking because it begins at a much higher base of illumination.

- This pattern is observed across U.S. cities, with the phenomenon driven by widespread cultural practices and the suburban landscape’s suitability for holiday lighting displays. The effect is visible in satellite data and was quantified at 20–50% brighter in December, especially in suburbs and city outskirts.

---

**2. Why is the Phoenix nighttime street grid so sharply visible from space, whereas large stretches of the interstate between midwestern cities remain comparatively dim?**

- Phoenix’s sharply visible nighttime street grid from space is a result of its urban layout: the city (like many western U.S. cities) was developed using a regular grid system, with extensive and uniform street lighting and strong urban sprawl. The grid pattern, and the dense network of intersecting surface streets, is brightly illuminated, particularly at intersections, commercial areas, and major thoroughfares.

- The interstate highways between midwestern cities, though significant in length and crucial to national infrastructure, traverse sparsely populated rural areas. These stretches typically have very little artificial lighting (due to low traffic volumes at night and cost considerations), making them much less visible in nighttime satellite imagery. Only nodes (cities and towns) along the route show as bright "pearls" in the darkness, while the "strings" (highways) connecting them remain faint or invisible.

- In summary:
  - Urban areas like Phoenix stand out with strong, connected patterns of light due to dense development and extensive lighting.
  - Rural interstates are sparsely lit, and only their endpoints—cities and large towns—generate notable light visible from space.

---

**References**:
- [Holiday Lights increase most dramatically in suburbs, not downtowns: earth_at_night_508_page_176_verbalized, page 160](4:5)
- [Lighting paths and urban grids are visible from space, while rural highways remain dim: earth_at_night_508_page_124_verbalized, page 108](4:3)
- [Phoenix’s grid and surrounding urban structure: earth_at_night_508_page_104_verbalized, page 88](4:1)
检查响应
来自代理的底层响应包含有关发送到知识库的查询及其关联引文的元数据。 可以检查此元数据,以了解代理如何处理用户输入。
response.to_dict()
清理资源
当你在自己的订阅中工作时,项目结束后删除不再需要的资源是一个好习惯。 让资源保持运行状态会耗费成本。
在Azure门户中,从左窗格中选择“所有资源或资源组以查找和管理资源。 可以单独删除资源,也可以删除资源组以一次性删除所有资源。
还可以运行以下代码来删除单个对象:
# Delete the agent
project_client.agents.delete_version(agent.name, agent.version)
print(f"AI agent '{agent.name}' version '{agent.version}' deleted successfully")

# Delete the knowledge base
index_client.delete_knowledge_base(base_name)
print(f"Knowledge base '{base_name}' deleted successfully")

# Delete the knowledge source
index_client.delete_knowledge_source(knowledge_source=knowledge_source_name)
print(f"Knowledge source '{knowledge_source_name}' deleted successfully.")

# Delete the search index
index_client.delete_index(index_name)
print(f"Index '{index_name}' deleted successfully")
提高数据质量
默认情况下,知识库中的搜索结果会被整合为一个大型的统一字符串,您可以将其传递给智能体作为基础依据。 Azure AI 搜索提供以下索引和相关性优化功能,帮助你生成高质量的结果。 可以在搜索索引中实现这些功能,搜索相关性的改进在检索响应的质量中显而易见。
计分概要文件提供内置的提升条件。 索引必须指定默认计分配置文件,检索引擎在查询包含与该配置文件关联的字段时会使用该配置文件。
语义配置 是必需的,但你可以确定哪些字段的优先级并用于排名。
对于纯文本内容,可以使用 分析器 控制索引期间的标记化。
对于多模式或图像内容,可以使用图像语言化实现 LLM 生成的图像描述,或者在索引期间通过技能组进行经典 OCR 和图像分析。
控制子查询数
可以通过在知识库上 设置检索推理工作(预览版) 来控制子查询的数量。 推理工作确定查询规划的 LLM 处理级别,范围从最小(无 LLM 处理)到中等(更深入的搜索和后续迭代)。
对于非最低限度的推理努力,LLM 根据以下因素确定子查询的数量:
- 用户查询
- 聊天历史记录
- 语义排名器输入约束
控制发送到智能体的上下文
响应 API 控制发送到代理和知识库的内容。 若要优化性能和相关性,请调整代理说明,以汇总或筛选聊天历史记录,然后再将其发送到 MCP 工具。
控制成本和限制操作
有关查询计划的见解,请查看知识库响应中的活动数组内的输出令牌。
提高性能
若要优化性能和降低延迟,请考虑以下策略:
汇总消息线程。
使用
gpt-5-mini或执行速度更快的较小模型。在编制索引之前,将大型文档分块成较小的部分。 超出输出预算的文档可以从有依据的结果中被悄无声息地省略。